Welding demands precision. Measuring tools are the key to having every joint, bead, and fit-up flawless. Constructing a steel frame, fixing a pipe, or creating a custom piece – they all rely on these tools ensuring the outcome is within exact spec, withstands extreme testing, and functions under stress.
From crude tape measures to high-tech lasers, choices now come in rugged yet high-precision models suitable for equipment like stick welders.
Go with the following content and delve into welding measurement tools in-depth. Full of actionable tips and trustworthy information, it’s a helpful guide to achieving precision in welding.
Why Measuring Tools Matter in Welding
When welding, an inch wrong can cause major issues. A 1/16-inch deviation in a pipeline weld might form a leak at less than 500 psi, and an over-sized fillet weld on a structural beam might weaken the joint or waste metal.
Industry statistics put the percentage of weld reworks due to measurement error at 20-25%—think grinding out defects or wasting costly steel for hours.
In addition to cost, there is safety: a measurement mistake in a weld on a pressure vessel can cause a catastrophic failure. Accuracy is not one thing you can afford to use the shortcut for; it’s the difference between getting it right and a big, costly redo.
A solid investment in reliable measuring tools pays dividends many times over:
- Accuracy: Get tolerances down to 1/32-inch—or 0.001-inch with high-end models—meeting industry-critic codes like AWS D1.1 or ASME B31.3.
- Efficiency: Save setup time up to 30%, so you can tack and weld faster without endless rechecks.
- Cost Savings: Avoid over-cutting filler metal or wasting misaligned parts—savings add up on every project.
- Safety: Catch defects like gaps or irregular welds early, preventing failures that can injure workers or end users.
- Consistency: Deliver consistent results on dozens of welds, critical for repetitive uses.
Essential Welding Measuring Tools
Must-Have Welding Measuring Tools
The following time-tested tools form the foundation of any welding operation:
- Tape Measure: Bending, 25-50 feet, with ±1/32-inch accuracy. Has locking blade and generally a magnetic tip for use on steel. Use to measure stock lengths, cut lines, or measure gaps before welding.
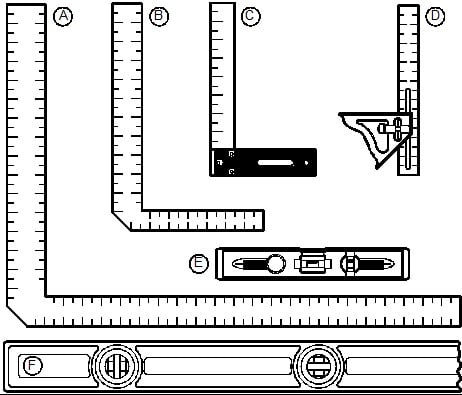
- Combination Square: 12-24 inches, typically stainless steel, with hardened steel head and blade. Measures 90° and 45° angles on plates or joints, and is used as a straightedge for layout. Accuracy: ±1/32-inch over 12 inches.
- Fillet Weld Gauge: Measures weld throat (height) and leg (width), 1/8 to 1 inch. Made of durable metal with etched graduations, it ensures welds are at design specs—essential for load-bearing joints.
Advanced Tools for Pros
For complex work, these tools offer specificity and precision:
- Hi-Lo Gauge: Inspects pipe misalignment with ±0.01-inch tolerance. Has two prongs—one for internal, one for gap width—so pipes are within 1/16-inch tolerance prior to welding.
- Pipe Pit Gauge: Inspects corrosion or wear depth on pipes, typically 0-0.5 inches, with ±0.005-inch accuracy. Digital models include LCD displays for instant reading, critical for maintenance welds.
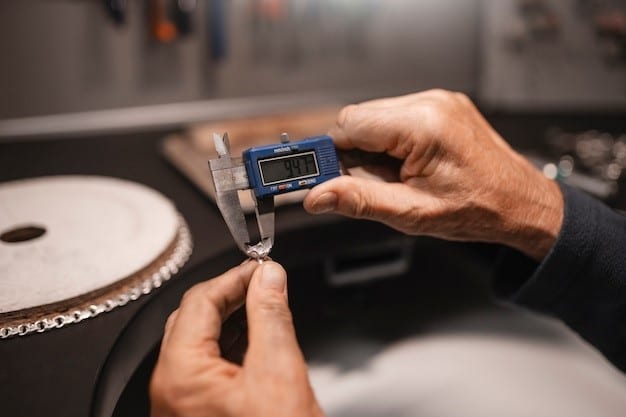
- Calipers: Vernier or digital, 0-6 inches, with ±0.001-inch accuracy. For measuring small gaps, weld bead heights, or material thickness—best for close tolerances in fabrication.
Modern Measuring Tools
- Laser Measuring Devices: ±1/16-inch accuracy at 100 feet, typically with Bluetooth to send data to apps or laptops. Angle calculation and memory storage make them ideal for large-scale layouts or multi-point measurements.
- Smart Gauges: Interface with phone apps for real-time logging, giving ±0.01-inch accuracy. Some incorporate LEDs for dark worksites, making inspection and reporting easier.
| Tool | Accuracy | Key Use | Range | Material |
| Tape Measure | ±1/32 inch | Stock sizing, gap marking | 25-50 ft | Steel/plastic |
| Combination Square | ±1/32 inch | Angle checks, layout | 12-24 inches | Stainless steel |
| Fillet Weld Gauge | ±1/16 inch | Weld size verification | 1/8-1 inch | Metal |
| Hi-Lo Gauge | ±0.01 inch | Pipe alignment | Up to 1 inch | Stainless steel |
| Pipe Pit Gauge | ±0.005 inch | Corrosion depth | 0-0.5 inch | Steel/aluminum |
| Calipers | ±0.001 inch | Small measurements | 0-6 inches | Steel/plastic |
| Laser Measure | ±1/16 inch | Large layouts | Up to 100 ft | Plastic/metal |
| Smart Gauge | ±0.01 inch | Digital logging | Varies | Metal/plastic |
How to Use Welding Measuring Tools (Step-by-Step)
Measuring Weld Size with Fillet Weld Gauges
- Clean the weld with a wire brush to remove slag, spatter, or oxide—debris warps reading.
- Select the gauge size that matches your weld (e.g., 1/4-inch leg).
- Hold the gauge tight against the toe of the weld, with it perpendicular to the base metal.
- Check throat (vertical measurement) and leg (horizontal measurement) against gauge notches.
- Record both measurements—e.g., “Throat: 0.18 in, Leg: 0.25 in”—for quality records or inspector reference.
Tips: Take measurements at multiple locations along the weld (e.g., every 6 inches) to maintain consistency. If the weld is irregular, take an average reading and note irregularities.
Note: Gauges will be worn from use—insure bent edge or worn marking exists monthly.
Checking Alignment with Hi-Lo Gauges
- Place prongs of gauge between pipe ends, one on the inside and one on the outside, before tacking.
- Drive in until surfaces are against gauge, keeping it level.
- Measure misalignment on scale—e.g., 0.03 inches high on one side.
- Correct pipe with hammer or clamp if greater than 1/16-inch tolerance, and then re-inspect.
- Compare gap width to the second scale on the gauge to ensure fit-up within specifications (e.g., maximum 1/8-inch).
Common Mistake: Take measurements of hot pipes—heat expansion can bend readings as much as 0.02 inches. Allow metal to reach room temperature before measurement.
Note: Wipe the gauge clean after use; dirt or rust clog the slide mechanism.
Using Laser Tools in Large Projects
- Put a solid reference point—e.g., corner stake or marked plate—on a level surface.
- Aim the laser at your target (e.g., 50 feet away), out of range of reflective surfaces that deflect the beam.
- Press the measure button; the device displays distance (e.g., 49.92 ft) on the screen.
- For layouts, record multiple readings (e.g., width, height, diagonals) and sync to an app or blueprint via Bluetooth.
- Check by re-measuring 10% of points—lasers may drift if bumped or low on power.
Advantage: Saves time 10-fold compared to tape on lengths greater than 20 feet—example: 2 minutes vs. 20 minutes on a 50-foot grid.
Note: Calibrate annually with a known length (e.g., a 10-foot steel tape) to guarantee ±1/16-inch accuracy remains.
Choosing the Right Tools for Welding Projects

Project-Based
Structural Welding:
- Combination square to square plates (e.g., 12×12-inch pieces).
- Fillet gauge to check 1/4-inch welds on beams.
- Calipers to check 0.1-inch flange gaps.
Pipe Welding:
- Hi-lo gauge for alignment of 6-inch diameter pipe to 1/32-inch tolerance.
- Pipe pit gauge for examination of 0.2-inch corrosion pits.
- Tape measure for cutting pipe 20-foot long.
Fabrication:
- Laser measure for laying out 30×40-foot frame.
- Smart calipers for 0.05-inch accuracy on intricate cuts.
Cost vs. Value
Entry-Leve ($10-$50):
- Heavy-duty steel construction, plain design—ideal for hobbyist or light work.
- Trade-off: Reduced accuracy on minor measurements (e.g., below 1/16-inch).
Mid-Range ($50-$150):
- Additional features like etched scales or LCD displays, suitable for frequent usage.
- Treads cost and precision for most professionals.
High-End ($150-$500):
High-end for big or critical projects—worth every penny if time saved matters.
Final Thoughts
Welding measurement tools are the key to welding precision. From basic tape measures to smart gauges, they promise accuracy, time-saving, and budget protection for your projects. With the must-haves, use them confidently and matched them with welding needs.
For more about welding equipment like MIG welders and TIG welders, you can explore welding equipment wholesale here!
FAQs
What’s the most accurate welding measuring tool?
Calipers are the leaders at ±0.001-inch for small measurements, and laser tools are at ±1/16-inch up to 100 feet.
How often should I calibrate my gauges?
Every 3-6 months, or 50 hours of use—compare to a known reference like a 1-inch block.
Are digital tools worth it for welding?
Yes, for speed and documenting on big jobs (e.g., 100 welds/day)—old-school tools still rule for convenience.
What are the must-haves measuring welding tools for beginners?
Start with the basics. These tools cover layout, alignment, and basic quality checks for the majority of small- and medium-sized projects.
- Tape measure (25–50 ft)
- Combination square (for 90°/45° angles)
- Fillet weld gauge (to measure weld sizes)
Are laser measuring tools accurate enough for welding?
Yes. Most modern laser instruments are accurate to ±1/16 inch over long distances (100 ft). They’re not gap-checking instruments—but perfect for layout and framing—work on large scales.